
Introduction to Checking Engine Oil
Regularly checking your car’s engine oil is a fundamental aspect of vehicle maintenance that should not be overlooked. Engine oil serves as a vital lubricant for the myriad of moving components within the engine, ensuring that they operate smoothly and efficiently. Without adequate lubrication, friction can lead to increased wear and tear on engine parts, leading to potential malfunctions or, in severe cases, complete engine failure.
One of the primary functions of engine oil is to reduce the heat generated by the engine’s moving components. When the engine operates, it generates significant heat, which can be detrimental if not properly managed. Engine oil helps to dissipate this heat, preventing overheating and ensuring that the engine remains at an optimal operating temperature. If the oil level is low or if the oil is dirty and degraded, it can lead to overheating, significantly affecting the vehicle’s performance and longevity.
Moreover, engine oil plays a crucial role in maintaining the overall health of your car. It helps to keep the engine clean by suspending contaminants and preventing sludge buildup. Regularly checking and changing your engine oil, as detailed in this tutorial, is essential for sustaining the efficiency and lifespan of your vehicle. This process not only enhances fuel efficiency but also contributes to better engine performance, ensuring your car runs smoothly over time.
This blog aims to provide a comprehensive guide on how to check your car’s engine oil correctly. By following the steps outlined in the subsequent sections, you will gain a clear understanding of how to perform this critical maintenance task, ensuring your engine remains well-lubricated and functioning optimally.
Gather Necessary Tools
To perform an accurate check of your car’s engine oil, it is important to gather a few essential tools before you begin the process. Having these tools at your disposal will not only simplify your task but also ensure that you can carry out the tutorial effectively and efficiently.
The primary tool you will need is an oil dipstick. This component is typically located near the front of the engine and provides the necessary measurements for oil levels. Utilizing the dipstick allows you to ascertain whether your engine contains an adequate amount of oil for proper operation. Familiarizing yourself with the markings on the dipstick can aid in understanding oil levels and determining if a top-up is required.
In addition to the dipstick, having a clean cloth or paper towel is vital. After removing the dipstick for inspection, it is essential to wipe it clean before reinserting it. This ensures that you get an accurate reading of the oil level. Residual oil can skew results, leading to misjudgments about the engine’s oil needs, which could cause potential issues down the line.
Another important item to have handy is a funnel, especially if you find that your oil levels are low and require replenishment. A funnel helps to prevent spills and ensures that you pour the oil into the appropriate opening without causing a mess. It is also advisable to have a bottle of extra engine oil on hand, as you may need to add some during your inspection. Selecting the correct type of oil, as specified in your car’s manual, is crucial for maintaining optimal engine performance.
By gathering these tools—a dipstick, clean cloth or paper towel, a funnel, and extra oil—you will be well-prepared to start checking your car’s engine oil accurately. This preparation makes it easier to conduct the necessary tasks and enhances the efficiency of your entire process.
Ensure the Car is on a Level Surface
When performing a tutorial on how to check your car oil engine, one fundamental step often overlooked is ensuring that the vehicle is parked on a level surface. Achieving an accurate oil level reading is crucial for proper engine maintenance and avoiding unnecessary complications. A sloped or uneven surface can significantly alter the measurements on the dipstick, leading to miscalculations regarding whether your engine requires additional oil or if there are underlying issues such as leaks.
To begin, find a flat area where you can safely park your vehicle. This can be a driveway, garage, or a level parking lot. Avoid parking on inclines or declines, as these can skew the oil level reading. Once you have parked your car, it is essential to allow the engine to cool down if it was recently running. Heat can cause the oil to thin and expand, which may result in an inaccurately high reading on the dipstick. Wait at least 10 to 15 minutes after turning the engine off to allow the oil to settle back into the oil pan.
After the waiting period, check to ensure that the car remains level. If you are unable to find a completely flat area, consider adjusting the position of the vehicle carefully until it is as level as possible. Once you confirm the car is on a stable surface, proceed with opening the hood to access the oil dipstick for your next steps. Following this method will not only help you correctly assess the oil level but will also contribute to the overall longevity and performance of your engine, making it a vital component of any maintenance tutorial for car owners.
Locate the Engine Oil Dipstick
When undertaking a tutorial on checking your car’s engine oil levels, one of the first steps is to accurately locate the engine oil dipstick. This essential component is generally situated near or on the engine block, and its primary function is to provide a means of checking the oil level within the car’s engine. Understanding where to find it can significantly simplify the process of maintaining your vehicle.
In most cars, the engine oil dipstick is a slender metal rod, typically with a brightly colored handle—often yellow or orange—making it easier to spot. Depending on the automobile model, it may be positioned towards the front or the rear of the engine compartment. Thus, it is advisable to consult your vehicle’s manual for specific details on its location, as designs can vary significantly between manufacturers and model years.
For many vehicles, particularly sedans or compact cars, the dipstick usually trends towards the center of the engine bay. However, SUVs, trucks, or older car models may have their dipsticks situated differently—sometimes located at an angle or towards one side. A quick glance under the hood will help identify the dipstick, especially if you are aware of its general placement. Pay close attention to visual indicators like a small loop or a handle that makes it easily accessible.
Familiarizing yourself with your specific vehicle’s layout, including the location of the oil dipstick, is essential for regular upkeep. Not only does this knowledge prevent any possible confusion, but it enables you to ensure your car’s engine maintains optimal performance levels through consistent checks of the engine oil. This proactive approach is a valuable part of car maintenance that can extend the life of your engine and enhance overall vehicle performance.
Remove the Dipstick and Clean It
To accurately assess your car’s engine oil level, the initial step involves removing the dipstick safely from its tube. Begin by locating the dipstick, which often has a brightly colored handle for easy identification. It is essential to ensure that your vehicle is parked on a flat surface and the engine is turned off. This position will allow for a precise and consistent reading of the oil levels.
Once you have grasped the dipstick by its handle, pull it out gently but firmly from the tube. Be cautious during this process, as excess force may result in damage to the dipstick or surrounding components. After removing the dipstick, the next critical step is to wipe it clean thoroughly. Use a cloth or a paper towel for this purpose. Cleaning the dipstick is vital because any residue or contamination present can lead to an inaccurate reading of your oil level. Such obstructions may provide false indications, potentially leading to overfilling or neglecting low oil levels.
After achieving a clean dipstick, reinsert it into the tube completely. This action helps reset the measurement for the next reading, and it ensures that any friction or debris present in the tube is cleared away before taking the actual oil level measurement. Once you have removed the dipstick again after reinsertion, observe the oil’s position on the cleaned section. The oil should be within the marked cross-hatched area, which typically signifies the proper range for optimal engine performance.
In summary, a careful approach to removing and cleaning the dipstick not only promotes the longevity of your engine but also allows for an accurate assessment of your car’s oil level. Properly engaging in this step is crucial in maintaining the overall health of your vehicle’s engine.
Check the Oil Level
Checking the oil level in your car engine is an essential maintenance task that should not be overlooked. To begin, park your vehicle on a level surface to ensure accurate measurements. Once the car is stationary, turn off the engine and allow it to cool for a few minutes. This will provide an accurate reading by allowing the oil to settle back into the oil pan.
Locate the dipstick, typically found near the engine. It is usually marked with a bright handle, often yellow or orange, making it easy to identify. Remove the dipstick by pulling it out of its tube and wipe it clean with a cloth or paper towel. This step is crucial, as it removes any oil residue that could lead to an inaccurate reading.
Next, carefully reinsert the dipstick back into the tube, ensuring it is fully seated. Remove it once again and observe the oil level against the markings. Most dipsticks will have two indicators, marking a minimum and maximum level. A proper oil level should ideally be between these two markers. If the oil is at or below the minimum mark, this indicates that your engine requires additional oil. In this case, refer to your vehicle’s owner manual to determine the correct type of oil to use, as it may vary depending on the engine specifications.
Should you find the oil level is low, adding oil is imperative to ensure the smooth operation of your car engine and to prevent potential damage. Use a funnel to pour oil into the engine carefully, checking the level periodically to avoid overfilling. Regularly checking the oil level, as outlined in this tutorial, is crucial for maintaining optimal engine performance and longevity.
Assess Oil Condition
Evaluating the condition of your engine oil is a crucial component of regular car maintenance. This assessment goes beyond simply checking the oil level; it entails a detailed analysis of the oil’s color, consistency, and any foreign substances present. Recognizing these characteristics can give you insight into whether an oil change is necessary.
Begin by removing the dipstick, usually located near the engine, after ensuring the vehicle is parked on a level surface. Wipe the dipstick clean with a lint-free cloth, then reinsert it and pull it out once more to check the oil’s color. Fresh oil typically appears amber and clear, while older oil may darken significantly, taking on a darker hue due to contamination. If the oil looks excessively black or resembles sludge, it’s an indication that it may be time for an oil change.
Next, consider the oil’s consistency. By rubbing a small amount of oil between your fingers, you can assess its texture. The oil should feel smooth and slippery, indicating good lubrication properties. If it feels gritty or has an unusual texture, this may suggest that particles are present, which could lead to engine damage if not addressed promptly.
Finally, inspect the oil for any unusual particles or debris. Small metal shavings, dirt, or other contaminants can indicate underlying issues with the engine. If you observe anything concerning, take advantage of a professional oil analysis or discuss it with a certified mechanic. Regularly assessing the condition of your car’s engine oil can prevent potential problems and extend the life of your vehicle. In summary, maintain vigilance in checking these signs to ensure optimal engine performance and reliability.
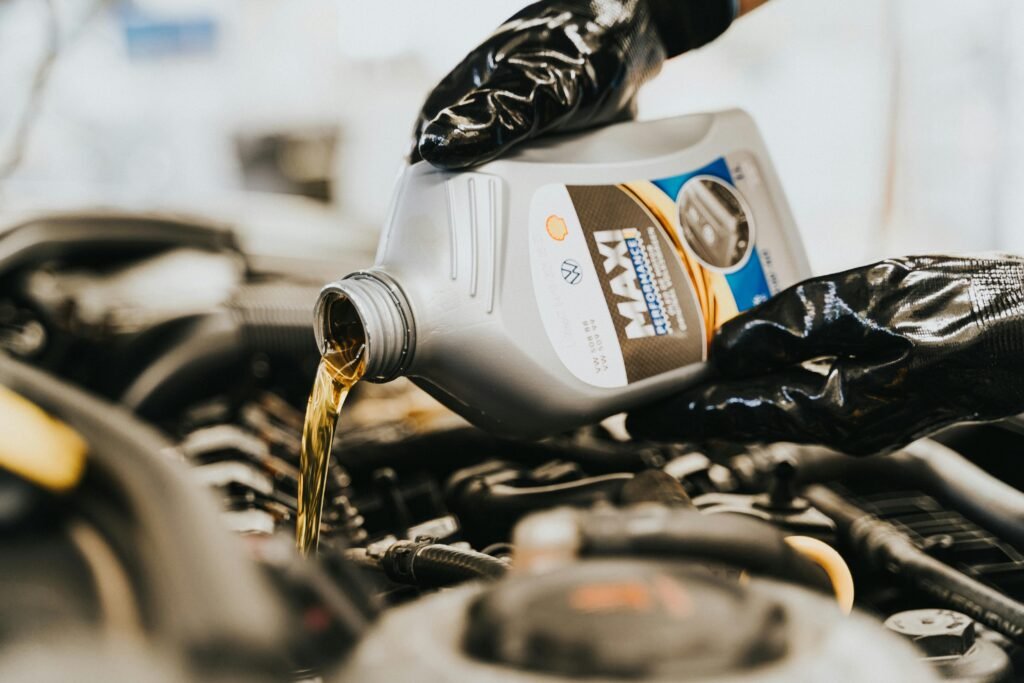
Add Oil if Necessary
Once you have checked your car’s oil level and determined that it is low, the next step is to add the appropriate oil to your engine. It is essential to select the correct type of oil for your vehicle to ensure optimal engine performance. Generally, your car manual provides specifications for oil viscosity and type, which may include options such as conventional, synthetic, or blended oil. These specifications should be consulted, as using the wrong oil can lead to engine damage over time.
Before proceeding to add oil, it is important to gather the necessary tools. You will need a clean funnel to facilitate the oil pouring process, and of course, the right type of engine oil. To begin, remove the engine oil filler cap, which is typically located on the top of the engine. Make sure the engine is turned off and has cooled down to prevent burns. Position your funnel over the opening and pour the oil slowly. This step is crucial to avoid spills that can lead to a messy engine compartment and potential hazards.
After adding oil, it is vital to check the level again to ensure you’ve added the correct amount. Wait a minute to allow the oil to settle before removing the dipstick again. Wipe the dipstick clean and insert it back into the tube. Pull it out and check the oil level; it should be at or near the full mark. If the level still appears low, you may need to add more oil gradually while monitoring the level, being careful not to overfill the engine as that can create pressure and oil leaks. This methodical and careful process is crucial to maintaining the health of your engine.
Final Steps and Safety Tips
Once you complete the process of checking your vehicle’s engine oil, it is crucial to maintain a few final steps to ensure everything is correctly addressed. Regularly inspecting the oil level is essential in prolonging the life of your engine and guaranteeing optimal performance of your car. Not only does maintaining proper oil levels prevent engine wear, but it also ensures that the engine runs smoothly and efficiently. Therefore, it is advisable to adhere to a routine checkup every few weeks, or at the very least before embarking on longer journeys.
When handling oil, it is paramount to prioritize safety. Engine oil can be greasy and potentially harmful if it comes into contact with your skin, so it is recommended to wear protective gloves during the process. Additionally, safety goggles can help shield your eyes from any accidental splashes. If oil spills occur, be sure to clean them up promptly, as they can create hazardous conditions. Furthermore, it is important to dispose of used oil responsibly. Many local auto shops or recycling centers are equipped to handle used oil, making it unnecessary to discard it in regular trash. This responsible practice not only contributes to environmental conservation but also complies with local regulations regarding hazardous waste disposal.
In conclusion, incorporating regular oil checks into your car maintenance routine is fundamental for ensuring the longevity and efficiency of your engine. By following the aforementioned steps, including proper safety practices while handling oil, drivers can maintain their vehicles in excellent condition. Regular oil assessments help prevent potential mechanical issues, thereby promoting a smoother driving experience. Always remember that a well-maintained engine is a key factor in safe and reliable driving.